How to Regrip A Golf Club
News

How to Regrip A Golf Club

Support our Mission. We independently test each product we recommend. When you buy through our links, we may earn a commission.

How to Regrip A Golf Club

How to Regrip a Golf Club: A Simple and Cost-Effective Guide

Regripping your golf clubs doesn’t have to be a daunting task. In this guide, we’ll take you through the step-by-step process of regripping, providing insights into not only the technique but the tools you need and where to find them. Not only can regripping be easy but it also allows golfers to potentially save money and customize their clubs.

Tools You’ll Need

Before diving into the regripping process, gather the following essential tools. If you need to purchase some of these tools we have provided links to some of our favorite sources.

  • Knife (preferably with a hook blade) – Hook Utility Knife
  • Vise with a shaft holder (rubber vise clamp) – Table Vise 
  • Two-sided grip tape or strips – Grip Tape
  • New golf grips (read about our favorite grips here)
  • Grip solvent or lubricant – Grip Solvent
  • Scissors (for cutting grip tape)
  • Marker (to mark grip length)
  • Garbage bag or bin for old grips and excess tape
  • Consider having a towel or clean cloth
  • Drip tray nearby to make the process smoother.
  • Grip tape stripper.
  • Heat Gun – While not a hard requirement, it can help make the most tedious step a lot easier. It will also come in handy for other club-building projects. – Heat Gun

Most of the essential tools and materials can be purchased as an All-In-One Bundle

Time Required

For first-timers, allocate 10 to15 minutes per club. As you become more practiced, the process will become faster.

Step-by-Step Regripping:

Step 1 – Prepare Your Workstation

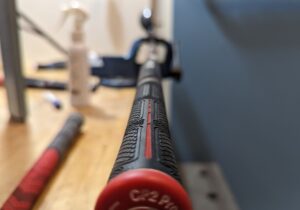
Set up your workstation by organizing your golf clubs, placing new grips within reach and having grip tape ready. Taking a few extra minutes to organize your workstation will help with getting into a rhythm and allow the whole process to go smoother.

 Step 2 – Remove Old Grips

Use a knife with a hook blade to cut through the old grip. Place the hook under the grip and cut away from you from the bottom of the grip to the top of the shaft. This can be done with the shaft in a vise or in hand. Both are effective methods but the vise is more secure and by hand being slightly faster. For stubborn grips, a second cut may be necessary. Once cut, peel away the grip, exposing the old grip tape.

Important! With graphite shafts, be careful to not tear through the tape or apply pressure with the edge of the knife into the shaft because you can potentially damage it. This is also where using a hook-blade utility knife versus standard utility knife with a straight blade is far superior.

Step 3 – Remove Old Grip Tape

Remove old tape using a heat gun for an efficient process. Keeping the heat gun or grip moving, apply enough heat to evenly loosen the tape’s bond to the shaft. This will allow for the tape to be removed far easier.

Important! Do not apply too much heat to graphite shafts as it can affect the integrity of the materials. While not as affected, steel shafts should also not be overheated.

This is often the most tedious and annoying part of regripping. However, it is important as extra tape will lead to the grip playing thicker than normal. For some, this is not an issue but it will also affect how soft the grip plays and feels. 

Step 4 – Install New Grip Tape

If you have not already, place the shaft into the table vise. Ensure the head of the club is aligned properly and the shaft is secure and will not twist.

Important! Do not over-tighten steel or graphite shafts and risk damaging them. Using the proper shaft holder will help protect them from damage and twisting.

Mark the grip length on the shaft using a marker. Doing this ensures proper placement of the tape and appropriate length of tape if you are not using a precut strip. It will also help with grip thickness consistency when installing.

Apply the grip tape and ensure it’s smooth without wrinkles. There should be about a half-inch of tape overhanging the end of the golf shaft. Remove a portion of the peel from the double-sided tape, wrap it around the shaft and smooth out before removing and discarding the rest of the peel. Finish by twisting excess tape into the shaft.

Step 5 – Install the New Grip

Spray grip solvent on the shaft and inside of the grip. Shake and pour excess solvent back onto the grip tape. Using more solvent will allow the grip to go on easier; however, it will also take longer to dry. Slide the open end of the grip onto the shaft smoothly and in one motion. Make sure the grip extends to the end of the tape and over the mark on the shaft which you made previously. Grips that are stretched are thinner while grips that are not inserted all the way will be thicker.

There should be no play or overhang in the butt end of the grip at the end of the shaft. The grip should be snug right to the end of the shaft. Align the grip and make any adjustments before the solvent dries. Wipe off excess solvent.

(Quick Tip: Grip gets stuck halfway? All is not lost! Grips can be removed easily at this stage using an air compressor or grip removal tool. At worst, the grip can be cut and removed to start over.)

Step 6 – Final Touches

Tap the grip on the ground to remove extra solvent or residue from the bottom of the grip. Double-check alignment visually and let the club dry in a warm area for 10 to 15 minutes with the grip facing down.

Other Quick Tips

While the described method is considered the standard to regrip golf clubs, it is not the only method. Many DIY golfers will use an air compressor for quick grip installation but you must exercise caution. Keep an eye out for our upcoming guide on how to use this procedure.

Grip solvent can help remove stubborn bits of tape. A rag with a little solvent can loosen difficult tape and help clean the golf shaft. Important before installing new tape: Wipe off all solvent and dry thoroughly so the new tape will adhere properly.

If grip solvent is unavailable, other options include mineral spirits or white spirits which will dry quickly. 

Again, marking the shaft ensures consistent grip length and thickness.

Another consideration is grip size. Typically, grips come in four sizes: ladies, standard, mid size and jumbo. For additional customization, adding wraps of tape or layers can provide the perfect feel and thickness. 

Putter grips may need more solvent for easy installation. Their construction is different and they are often more difficult to install due to a more rigid nature.

Expect a learning curve. Practice and learn from your mistakes.

To extend the life of fresh grips, cleaning them regularly is key. Use warm soapy water, a nylon bristle brush and rinse thoroughly.

Cost and Savings

If you are new to this and do not have any supplies, the basic cost to get started will be roughly $50 (regripping kit and table vise). Additional costs which are optional but can make the process simpler long-term are a roll of grip tape (roughly $12) and a heat gun as mentioned ($29.99). Costs of the grips will vary depending on their quality. 

After initial start-up, regripping your clubs can lead to significant savings. By regripping independently, you could save up to a couple of hundred dollars per season, depending on the number of clubs and the cost of grips.

In my case, using the Saplize grip kit from Amazon, I saved roughly $140 compared to having my grips done at a local shop.

Have questions? Ask below in the comments section for us to help you through your regripping journey!

Want to see more content like this? Let us know in the comment section below!

For You

For You

News
May 1, 2024
Five U.S. Buddy Golf Trips That Won’t Break The Bank
News
May 1, 2024
Best Public Golf Courses Near NYC
First Look
May 1, 2024
Tiger, TaylorMade are Officially in Their Sun Day Red Era
Jamie Danbrook

Jamie Danbrook

Jamie Danbrook

Jamie is the MyGolfSpy Forum Director. A Canadian living in Switzerland can often be found posting on the forum under the username GolfSpy_APH. When not on the forum he can be found on the course, or with his wife, two kids and three dogs hiking and exploring. He prides himself in being a lefty golfer and is still in search of his elusive first hole in one.

Jamie Danbrook

Jamie Danbrook

Jamie Danbrook

Testers Wanted: Titleist Vokey Wedges
Apr 28, 2024 | 4 Comments
Testers Wanted: Stix Golf Series
Apr 27, 2024 | 1 Comment
Is a $100 Golf Simulator Any Good?
Apr 25, 2024 | 5 Comments
Jamie Danbrook

Jamie Danbrook

Jamie Danbrook


    This site is protected by reCAPTCHA and the Google Privacy Policy and Terms of Service apply.

      Brian

      1 week ago

      What are the considerations and possible problems when installing Winn grips?

      Does the solvent have any adverse affect on Winn grips?

      Also, what is the procedure when installing the large SuperStroke type grips to putters?

      I have to admit, when fitting conventional putter grips, (eg Golf Pride), I do not have a very good eye for getting the grip square to the putter face.

      To get around this I use a cheap inclinometer to get the putter face as vertical as possible. If the putter head is steel and is magnetic – even easier.

      After pushing the new grip on and before the tape adhesive sets, I use three small spirit levels set at bottom, top and mid grip and manipulate the grip until it centres the bubbles on all three levels.

      Might seem pedantic but it works every time for me.

      Reply

      Jamie Danbrook

      1 week ago

      Winn grips aren’t my favorite grips to install, but there is nothing wrong with them! Many or most have a foam core or inside that just makes them a little different. That said, there is no issues using solvent for them.

      The only downside really with Winn is they are very difficult to not destroy if you are trying to remove and reuse them.

      For SuperStroke and any larger putter grips the main thing is just be generous with the solvent. You want it to slide on as easy as possible as there isn’t much give in them and they are difficult to remove if stuck half way.

      Reply

      dweed (dick erdmann)

      1 week ago

      In re-reading this article I just want to add that a tray to capture the excess solvent is really a necessary item. A cheap plastic paint roller tray will work just fine.

      Reply

      dick erdmann

      4 months ago

      Nicely done. All the main/key points covered well. As you mentioned, this really isn’t that hard to do. I found, even in the winter this is the perfect time to keep “golf” in the forefront and save a few bucks. My only safety thought is more for folks that live in colder locations and might do this in a cool place. Keep the elec/gas heaters a good distance from the work bench. Many of the solvents or mineral spirits are pretty flammable. Enjoy folks. Can’t go wrong following Jamie’s lead.

      Reply

      ROB PERSON

      4 months ago

      Great article.

      Mark me down on the “watched a few videos and tried this” column

      Once! I did it once! Didn’t have a heat gun, didn’t have a vice, used a carpet knife, used dish soap, Grip tape was too thick, ruined a perfectly good grip. Cursed alot!

      Ended up buying one at the local shop for $5 and install it for me (free)
      These how-to articles and videos are very informative and helpful! Thanks

      Reply

      jbern

      5 months ago

      Timely article as I just started regripping my clubs this fall. As you mention, it seems a little daunting at first, but once you get going it’s actually pretty simple and satisfying.
      Thanks for writing the suggestion of cleaning the grips regularly. A golf buddy of mine never cleans his grips and every time he complains about his grips being bad I tell him to go clean them (he never listens). Another suggestion would be to clean the bottom of your golf bag. After a few months, the bottom of my bag turns a towel black with dirt/dust. All of that dirt/dust goes straight on the grips and will reduce the life.
      Glad to hear you’re planning to release an air compressor grip application version. I’ve been interested in trying that method, so I can test grips without destroying them.

      Reply

      Vaducci

      5 months ago

      Great article. To conserve materials/costs even more, I use a dedicated paint roller pan with a punched out hole in the corner of the shallow end to collect the excess solvent. Then I pour that excess back into the solvent bottle (using the hole) for the next grip replacement. That way I can be generous with the solvent, ensuring sufficient coverage.

      Reply

      rkj427

      5 months ago

      I have been installing my own grips for a few years, and all of the points mentioned in the article are “spot-on” for making sure someone doing it for the first time themselves gets it accomplished correctly.

      Great to see MGS providing some “How To” articles to help eliminate some costs some golfers may face by not performing things they could easily do if provided good instructions.

      Reply

      Beak

      5 months ago

      If you don’t like fooling around with solvent, you can buy water activated tape. It’s safer. I add a little dish washing liquid to the water and grips slide one easily. I don’t replace the tape unless it looks off. I have used my local golf course guys to replace grips for $2, but they are all over the place as far as alignment. I also am not sure how much money you save, but there is fun in knowing you did it and can do it anytime.

      Reply

      WYBob

      5 months ago

      I think it’s great when MGS does these “How to …” articles. Regripping is a smart place to start when introducing someone to basic clubbuilding. That said, I am not sure I get the economic argument presented in the article- ie. saving $140 a season by not having regripping done at your local shop. It costs me $1 per club (plus the cost of the grip) at my local club for regripping. Another local club charges $2 per club. In both cases, the actual price of the grip is the same as if I ordered the grips directly or online. So it cost me $14 + the cost of the grip to have a local pro regrip my clubs at the begining of the season, not $140. I used to build clubs so regripping them myself is not an issue, but frankly I’d like to avoid the “mess” of regripping if I am only doing 14 grips per season. I do appreciate these “how to” articles and would love to see more of them.

      Reply

      MyGolfSpy Forum

      5 months ago

      Glad you enjoyed the article and we are looking to do many more of these!

      As for the pricing, I was actually a bit conservative in my case. For me to have my clubs regripped locally with the MCC Plus 4 which I enjoy is $23 per grip, then depending on the time of year another $3-$5 for installation of the grip. Sometimes they will offer a deal with free gripping. So just the cost for grips is about $300. In my case I was able to get the Saplize grips and the kit for $60.

      As you said the cost of grips can be the same regardless, there are some deals to be had. The number mentioned is based on my personal experience and situation. I am very glad you shared yours as well!

      Reply

      WYBob

      5 months ago

      Thanks for the reply and clarification. FYI- you can order the MCC Plus 4 directly from Golf Pride for US$11.99/per grip. Based on the pricing you provided, that alone will save you US$11.01/per grip (unless you live in Canada where the price conversion is CAD16.27/per grip and the savings are CAD 6.72/per grip). The total grip cost for 13 clubs would be US$155.87 vs $300 (or a savings of US$144 if you are regripping yourself). I hope that helps save some additional money. Cheers…

      tdroma98

      5 months ago

      Great Article! I started regripping my irons a couple of years ago. Learning more & more along the way, first using masking tape & a regular utility knife. Utility knife doesn’t work too well for graphite shafts, since it could cut the graphite shaft. 2 weeks ago I purchased a 13 pack of grips, which included a carpet hook knife. Oh my! Did it cut the grip in no time! Hook blades are a must!
      Just started using two-sided tape instead of masking tape & use mineral spirits for lubricant. I don’t have a vice, so I put down a thick towel in a corner of workbench & wall to install grip. It works great. Key is not to stop sliding grip down the shaft. It’s fun to install the grips & you can experiment building grips to your hand.

      Reply

      Tony Bumstead

      5 months ago

      I have a 17″ grip on a putter that I would like to remove. Is there any way I can save the grip? My removal tool is only good for 10″ grips. I have been changing my own grips for years and have all the usual tools.

      Reply

      Mark Smolens

      5 months ago

      Even tho they are in the process of going out of business, the Pure Grips air compressor installation tool has been a lifechanger for those of us who like to replace grips on our own. No solvent, heat gun, curved Xacto knives necessary! You can use tape to make sizing decisions, but don’t have to. On bare or dry taped shafts I can replace an entire set of grips (don’t need to use their brand of Pure grips, I’ve used the tool to install any number of different brands!) in less than 20 minutes

      Reply

      MyGolfSpy Forum

      5 months ago

      Regripping with an air compressor is on our list for future articles. We felt being a different and somewhat unique method it would deserve its own write-up.

      I often will us an air compressor to do mine as it can be a lot quicker. Oddly enough I had a bit more grip twist this summer with those grips this season.

      Thanks for commenting and be on the look out for a future article that covers just that topic!

      Reply

      ArchieBunker

      5 months ago

      I have been re-gripping my clubs for years, and don’t do half of the steps mentioned here. I use an ordinary knife to cut the grips off, and don’t bother to remove the existing tape unless it comes off easily. The tape I use is extra thin and on a 1/2 inch roll. I simply run a spiral up the shaft. Pour some ordinary paint thinner into the grip, swirl it around, and pour it over the taped shaft. Slip the grip on and I’m done. Works for me.

      Reply

      MyGolfSpy Forum

      5 months ago

      Appreciate the feedback! Of course there are plenty of short cuts and areas that can be skipped. However we wouldn’t be doing our jobs if we skipped possible important steps for those looking to just get started. As someone gets more experienced like yourself, they will find their own flow and methods which they can adapt and make work for them. I personally can’t stand removing tape. When I worked in the shop my fingers be wrecked from it, however it was our standard practice to always remove the old grip tape.

      Those that want larger grips can add extra wraps or leave the old stuff on. I personally like to remove it for consistency purposes across all my grips.

      Reply

      No3PuttLaLa

      5 months ago

      I did this for the first time this summer. There are definitely some crooked and thin grips. This article helps explain the process in a very easy and simple to understand way. Thank you again, my golf spy!

      Reply

      MyGolfSpy Forum

      5 months ago

      It can definitely take a few attempts! Glad you enjoyed the article and thanks for reading!

      Reply

      SV

      5 months ago

      Two comments: First, a towel or cloth is a requirement, not an option. It will be needed. Second, after tamping the grip down, set the club on the ground with the head up. Sometimes air will get trapped in the grip and push it up the shaft slightly leaving the grip “too long”. After a few minutes standing up this should not be a problem.

      Reply

      MyGolfSpy Forum

      5 months ago

      Good suggestions and appreciate the added insights. Only reason I put as towel or cloth as option is I do know some who don’t and will use paper towel or in some cases nothing.

      Appreciate the comments and thanks for taking the time to read!

      Reply

      nakman7

      7 days ago

      The price of grips is ridiculous I use Rexton grips they are great for the price

    Leave A Reply

    required
    required
    required (your email address will not be published)

    This site uses Akismet to reduce spam. Learn how your comment data is processed.

    News
    May 1, 2024
    Five U.S. Buddy Golf Trips That Won’t Break The Bank
    News
    May 1, 2024
    Best Public Golf Courses Near NYC
    First Look
    May 1, 2024
    Tiger, TaylorMade are Officially in Their Sun Day Red Era
    ENTER to WIN 3 DOZEN

    Titleist ProV1 Golf Balls

    Titleist ProV1 Golf Balls
    By signing up you agree to receive communications from MyGolfSpy and select partners in accordance with our Privacy Policy You may opt out of email messages/withdraw consent at any time.