



(Note: This article is an informal explanation of the basic fundamentals of some of the most important Rules of Golf. It is not intended to be an official guide. Please refer to the Rules of Golf provided by your national golf association online.)
You’re standing over your ball in the rough, staring at a twig behind it, wondering if touching it will cost you a stroke. Your drive rolls up next to a cart path and now you’re stuck—do you play it? Can you move it? Your buddy casually mentions something about “nearest point of relief” while you’re just trying not to hold up the group behind you.
Look, I get it. Golf rules can feel like a minefield designed to trip you up. But here’s what changed everything for me: these rules aren’t trying to punish you. They’re actually there to help you out of tough spots and keep things fair for everyone. Once you get the hang of the basics, those tricky situations become puzzles to solve rather than moments of panic.

The Golden Rule: Play it as it lies
This is golf’s fundamental principle and it’s beautifully simple: play the ball where it comes to rest. Whether your ball is sitting pretty on the fairway or nestled against a tree root, the default is to play it as you find it.
This rule creates the challenge and character that makes golf unique. Unlike other sports where you get do-overs, golf forces you to deal with whatever situation your ball creates. But here’s what many beginners don’t realize: the rules provide plenty of relief options when “playing it as it lies” becomes unreasonable or impossible.
The key is understanding when you can take relief and when you can’t. Most relief situations are covered by specific rules which we’ll explore below.
Know your relief options
Unplayable ball: This is your safety net. If your ball is in a spot where you genuinely can’t make a reasonable swing—buried under a bush, against a fence or in thick roots—you can always declare it unplayable. You have three options, all with a one-stroke penalty:
- Go back to where you last played (stroke and distance).
- Drop within two club-lengths of the ball, no closer to the hole.
- Draw a virtual line from the hole through your ball and drop anywhere on that line going back as far as you want.
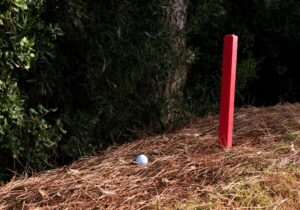
Penalty areas (formerly “hazards”): If your ball goes into a pond, stream or marked penalty area, you get relief with a one-stroke penalty. You can either go back to where you last played or drop within two club-lengths of where the ball last crossed the margin (for penalty areas marked with red stakes).
Cart path relief: Free relief—no penalty stroke. Find the nearest point where you can take a stance and swing without interference from the path, then drop within one club-length of that point, no closer to the hole.
The two-club-length rule
This measurement appears in many relief situations so master it early. Hold two clubs end-to-end to measure your relief area. Always measure from the reference point (where the ball lies, nearest point of relief, etc.) and remember that you can drop anywhere within that area but the ball must stay within it after bouncing.
When you drop, hold the ball at knee height and let it fall naturally. If it bounces out of the relief area, drop again. If it bounces out twice, place it where it hit the ground on the second drop.
Penalties that actually help you
Many beginners fear penalty strokes but they’re often your best option for getting back into play quickly. Taking a one-stroke penalty to get out of trouble is almost always better than trying a heroic shot that might cost you three or four strokes.
Lost ball or out of bounds: If you can’t find your ball within three minutes or if it goes out of bounds (marked by white stakes), you must take “stroke and distance.” This means going back to where you last played and adding one penalty stroke.
Provisional ball: If you think your ball might be lost or out of bounds, play a “provisional” ball from the same spot. This saves time—if your original ball is indeed lost, you’re already hitting your fourth shot (original shot + penalty + provisional + this shot).

Course markings decoded
White stakes: Out of bounds. You cannot play from here.
Red stakes: Lateral water hazard. Relief options available with one-stroke penalty.
Yellow stakes: Water hazard. Relief options available with one-stroke penalty.
Blue stakes: Ground under repair. Free relief available.
Colored lines serve the same purpose as stakes of the same color however white paint can mark ground under repair or abnormal ground conditions.
When to take relief (and when not to)
You can take relief from: cart paths, ground under repair, casual water (puddles) and immovable obstructions like sprinkler heads that interfere with your stance or swing.
You cannot take relief from: trees, bushes, bad lies in the rough or natural features like rocks and bare ground (unless marked as ground under repair).
The distinction is simple: man-made obstructions and abnormal ground conditions give you relief. Natural features of the course don’t.

Building confidence with the rules
Start by learning these core situations—they cover 90 percent of what you’ll encounter. Don’t try to memorize every rule. Instead, understand the principles behind them. Golf’s rules are based on fairness and keeping the game moving.
Most importantly, don’t be afraid to ask questions of the club pro or a rules expert at your regional golf association. The golf community wants you to succeed and feel comfortable on the course.
The bottom line
Here’s the thing about golf rules: they’re not there to trip you up—they’re actually your best friend when you’re in a jam. Once you know the basics of playing it as it lies, when you can take relief and how penalties work, you’ll stop panicking and start problem-solving.
The rules have your back. There’s pretty much always a way out of whatever mess you’ve gotten yourself into and it’s all designed to keep things fair while letting everyone have a good time. Learn the essentials, play honestly and fairly and never hesitate to ask someone for help.
When you know the rules, you become the kind of player others want to be paired with. You’re not slowing things down, you’re not stressed out and you can actually focus on the fun part—hitting the ball and enjoying your round.









Mike
1 year ago
You missed 1 option we have we have in penalty areas:
BACK-ON-THE-LINE RELIEF
This second option changed a little from the 2023 Rules revisions. First, determine the point at which your ball last crossed the edge of the red penalty area. Then, go back as far back as you wish on a line that keeps that point directly between you and the hole.
If you are able to find or see your ball, remember it may have crossed the penalty area some distance from where it is now lying, and it is the point at which it last crossed the edge that you must use.
Now drop your ball. The spot on the line where the ball first touches the ground when dropped creates a relief area that is now one club-length in any direction from that point (previously not nearer the hole than the reference point), but with these limits:
* It must not be nearer the hole than the estimated point where the original ball last crossed the edge of the penalty area, and
* May be in any area of the course except the same penalty area, but
* Must be in the same area of the course that the ball first touched when dropped.
You are not allowed to drop within the penalty area even if it would be practical to do so (e.g., there is an area of grass between the edge of a pond and the red stakes or lines).
The reason for this change is that, since you are allowed to drop back as far as you like on the line anyway, the ball rolling up to a club-length nearer the hole after the drop is not an issue as you could have chosen to drop there anyway.